The ultimate ergonomics guide for eMTBers of all skill levels – Bike fitting with the pros from Ergon

We had the chance to visit the ergonomics experts at Ergon, looking behind the scenes of their HQ in Koblenz, Germany where they develop their ergonomically optimised products. While there, we sat in on a professional bike fitting, finding out how to adjust your saddle and handlebar correctly in 7 steps.

The saddle chafes, your back hurts – discomfort on the bike is more than just annoying, often resulting in your ride being cut short. Therefore, pain-free cycling is many riders’ top priority, and bike ergonomics is the name of the game at Ergon. Ergon are all about making your rides more enjoyable by improving your bike’s ergonomics. If the contact points between you and your bike are ergonomically optimised and perfectly adjusted, riding can be so much more fun. To this end, a development team consisting of nearly 30 people works with experts from almost every discipline.


Let’s not overthink things, why not just get on the bike and ride? When you get a new car, the first thing you do is adjust the seat and position of the steering wheel, and the same is true for bikes. If the fit isn’t right, you usually have to put up with pain, numbness or hot spots. That said, the biggest challenge is pressure relief. Ergon have dedicated themselves to solving these problems, focusing on the ergonomics of the contact points between the bike and rider. The goal is to finish a long ride without having noticed the saddle, or your hands, shoulders and torso feeling limp. The sit bones as well as the bony and muscular structures in our bodies are well suited to absorbing pressure, but the contact points must be right. Before starting with the actual bike fitting, it makes sense to consider your specific issues and requirements. To do so, it’s important to know what your goal is, which bike you ride and what your job and everyday life look like. Bike fitting is a very complex topic, incorporating all these factors, and, ultimately, it’s the accuracy of the measurements that determines the result. Although beginners don’t often go for a professional bike fitting, we accompanied eMTB beginner Eric as he got his new eMTB adjusted by a specialist. In this case, the specialist in question is Simon, a sports scientist and project engineer from Ergon’s ergonomics department. Using professional tools, he finds a perfect fit between Eric and his new eMTB. He also reveals how you can perfect the fit on your eMTB with the help of Ergon’s MTB Expert Fitting Box or a good basic setup with simple things that everyone should have at home.


Step 1:
Finding the right saddle and the right saddle width
According to Simon, the first crucial step is to choose a gender-specific saddle. According to the experts, the differences between women and men in the soft tissue as well as bony structures in the sitting area require adapted relief zones to provide long-lasting, pain-free riding fun. Next, you’ve got to determine the saddle width. You’d think a wider saddle is more comfortable, but that isn’t true. As a rule of thumb, the distance between your sit bones determines the width of your saddle. Those in the know will have a special TS1 Digital stool with pressure sensors for the measurement – you should find one at your local Ergon dealer. If you don’t have a high-tech measuring device at your disposal and don’t have an Ergon dealer nearby, you can use a piece of corrugated cardboard to determine your approximate sit bone distance at home. All you have to do is sit on it and then measure the distance between the centre of the two indentations that your sit bones made on the corrugated board. You shouldn’t wear bib shorts while sitting on the cardboard because doing so can give you an incorrect measurement. Ergon divide their saddles into two sizes for sit bones ranging between 9 and 12 cm and 12 and 16 cm apart. If you need help finding the right saddle and the right size, you can use the online Saddle Selector on the Ergon website. Eric wants to go on trail tours aboard his eMTB, including long climbs and alternating trail sections, so he opts for the Ergon SM E-Mountain Core Prime Men saddle. It features a pronounced lip at the rear to provide additional support when riding uphill.

Step 2:
Finding the right saddle height
Once you’ve got the right saddle, you’ve got to adjust the saddle height. That way, you can ensure optimum power transfer. Stop, not so fast! For the correct saddle height, you must determine your inseam length. At Ergon, they’ve got pro tools for this, but you can also clamp the Fitting Box or a book between your legs to find this measurement at home. Make sure that the box or book is level – there’s a spirit level included in the Ergon Fitting Box. It’s best to let someone help you measure the exact distance from the floor to the top of the Fitting Box or book. Note: you’ve got to do this measurement barefoot. You can then calculate the saddle height using a formula. Inseam length x 0.885 gives you the distance from the centre of the bottom bracket to the upper edge of the saddle. There’s a template included in the Fitting Box which will help you find the height of the upper edge while compensating for different saddle shapes. The reference point of the measurement is where you actually sit rather than where the seat post ends. The calculated saddle height is then measured from the centre of the bottom bracket to the upper edge of the saddle.

Pro tip: Adjusting your ebike is particularly easy if you mount it to an indoor trainer. However, make sure that the axle height of the trainer matches the axle height of your rear wheel. If the wheel sizes are the same, the rear axle must be at the same height as the front axle. If you have an ebike with mixed wheel sizes, the rear axle is usually slightly lower.
Step 3:
Finding the right saddle tilt
The next step is adjusting the saddle tilt. Doing so ensures freedom of movement and doesn’t restrict the rotation of your pelvis. The saddle tilt determines how much pressure you feel on your hands, pushing your body forward and increasing the pressure, depending on the angle To adjust the saddle tilt, the bike must be standing upright. The tilt isn’t measured along the entire length of the saddle, but only along the actual contact surface. To do so, there’s a special template and a spirit level included in the Fitting Box. Without the template, you can also make do with a short spirit level. Depending on the suspension, keep in mind that the tilt of the saddle changes when sitting on the bike as it sags into its travel. As such, it makes sense to fine-tune the tilt during a test ride. If you feel pressure in the genital area, you’ve got to tilt the saddle slightly more forward. If you slide forward while riding, raise the saddle’s nose a little instead. As a starting point, however, the contact area should be level.

Step 4:
Finding the correct fore and aft saddle position?
The fore and aft saddle position determines where the saddle is positioned in relation to the bottom bracket. The fore and aft position of the saddle influences your posture on the bike, centre of gravity and power transfer. It should be adjusted in such a way that the so-called point of applied force, which is located under the kneecap, is in line above the pedal. The rule of thumb for the fore and aft saddle position is: the longer the inseam length and the more you’re intending to pedal, the further back the saddle should be. In the Fitting Box, you will find a plumb and a template to adjust the fore and aft seat position to within a millimetre. Alternatively, you can sit on the bike with your feet on the pedals and the cranks level with the floor. Hold the plumb so that it’s hanging from your kneecap and then move the saddle backwards or forwards until the plumb line passes through the pedal’s axle. Typically, eMTB riders want the saddle a little further forward to sit more centrally on the bike when climbing.


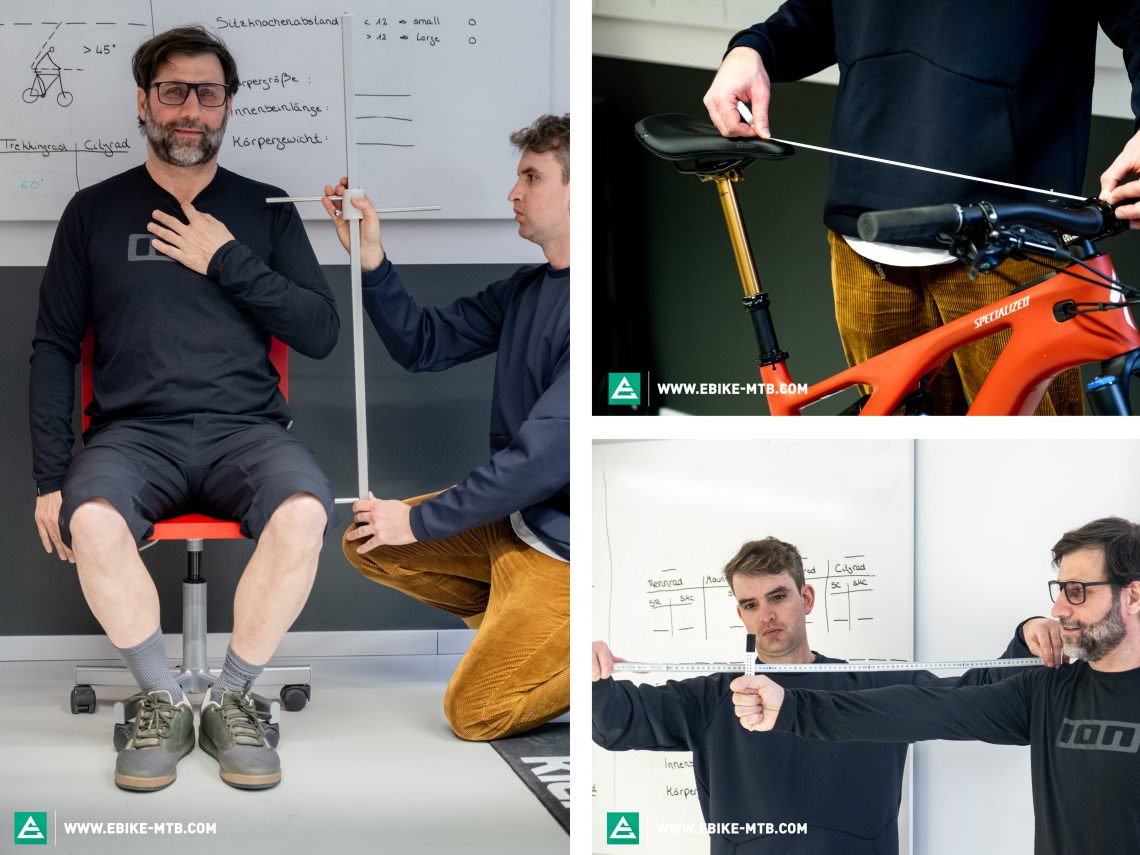
Step 5:
Finding the right distance between the handlebar and saddle
The handlebar/saddle distance determines the angle of your torso when you’re sitting on the saddle, optimising control, comfort and efficiency when adjusted correctly. The distance is measured from the tip of the saddle to the middle of the handlebar and depends on the size of the rider, particularly the length of the torso and arms. The distance from the saddle to the handlebar gets adjusted via the stem. That said, you’ll want to avoid extremely short or long stems because this could have a negative effect on the handling. Instead, you can resort to a handlebar with more or less sweep while also considering the handlebar width.
As a general guideline, it’s recommended that you adjust the distance to the handlebar so that your torso is angled at 40–45°. Leisurely riders who want to sit comfortably and upright on long rides and let the motor do more of the work can choose to shorten this distance a little. On the other hand, if you want to pedal hard, you can increase this distance for a more aggressive riding position.
Step 6:
Finding the right handlebar height
Now we come to the fine-tuning of the upper body position. The handlebar height determines the load on your arms and the weight distribution on the handlebar and front wheel. It’s measured by the difference between the saddle height and the top of the handlebar. In turn, the height difference depends on the rider’s size and intended use. In disciplines where riders do a lot of pedalling, the saddle is usually higher than the handlebar. For gravity oriented or more leisurely riding, the handlebar is approximately the same height or even higher than the saddle. It’s time to get the calculator back out – we’ve got to do a little more maths for this one. The handlebar height is determined with the help of the following formula: (torso length – (arm length x 0.95)) / 2. A value less than 0 tells us that the handlebar should be as many centimetres below the saddle. Conversely, a value greater than 0 indicates that it should be that many centimetres above the saddle. The height of the handlebar can be adjusted by means of spacers under the stem, by the stem angle and by the rise of the handlebar. If you do adjust it, remember to check that you’ve torqued all the bolts correctly.

Step 7:
Test ride on the trail and readjust
After setting it all up, it’s time to hit the trails. It’s important not to overdo it on the first test ride so that you don’t strain and possibly injure yourself. Go for a short ride and pay attention to your first impression, uncovering the biggest adjustment errors. The more nuanced aspects will only become noticeable on longer rides. To get used to a new saddle, it is essential not to take overly long breaks and ride regularly. That way, you can determine if the saddle fits. If you’ve still got complaints after your test rides, you can readjust. The saddle tilt often gets adjusted to suit personal preference and, in case of numbness, you might want to lower the nose of the saddle slightly. If knee problems occur, you can adjust the saddle height to adjust the knee angle. If you’ve got pain in your neck or numb hands, the distance between the saddle and handlebar can be reduced or the height of the handlebar increased. Be careful not to take too much weight off the front wheel to maintain grip. Have you adjusted your bike perfectly but continue to suffer from numbness in the palms of your hands or sore wrists? In that case, you may be using the wrong grips, or the ergonomics of the cockpit aren’t right for you. The grips often influence whether you get arm pump or not. You’ve got to find a balance between damping and control. To test this, it’s best to go on a long trail ride. The shape, Shore hardness and texture of the surface determine the grip’s characteristics. Regarding cockpit ergonomics: experiment with the position of your brakes, so that you don’t have to bend your wrist too much while riding with a finger on the lever. If you still suffer from pain in the palm or ball of your hand, you should consider changing the grips. Depending on the use case, ergonomic grips with small to medium-sized wings might help reduce or prevent nerve irritation. Ultimately, all that matters is that you feel good on the trail.


In women’s anatomy, the pelvis is tilted more forward and is somewhat flatter and wider, often exposing the sensitive genital area to a lot of pressure. As such, women’s saddles require a different relief channel.

made of Infinergy material, sandwiched in between the two shells. This dual shell technology actively supports your natural pelvic movements while pedaling.
In the long term, riding your eMTB can only be fun once the ergonomics are right. It’s the key to less discomfort and more performance. Unfortunately, ergonomics is neglected all too often, especially on the bike. But the right saddle and grips or a bike fitting can increase comfort and reduce discomfort. So, what are you waiting for? Grab your bike and do it yourself or ask a professional.
Did you enjoy this article? If so, we would be stoked if you decide to support us with a monthly contribution. By becoming a supporter of E-MOUNTAINBIKE, you will help secure a sustainable future for high-quality cycling journalism. Click here to learn more.
Words & Photos: Mike Hunger